IN CLASS | CUE
Exercises that incorporate the bridge position offer benefits to many areas of the body. In particular, they strengthen the deep postural muscles that support the spine. They also help improve “spinal articulation,” a term that simply means that each bone vertebrae along the spinal column – from the coccyx to the neck – can move individually and sequentially. The Shoulder Bridge is often used to work on deep spinal articulation. When done slowly and methodically, this position helps open the vertebral column and improve flexibility. But it can also be worked at a quick pace to build strength in addition to suppleness. To achieve deep spinal articulation, the pelvis tilts posteriorly and each vertebrae in the lumbar spine imprints into the mat before lifting the hips and peeling the vertebrae of the thoracic and cervical spine off the mat. The motion is then reversed as each backbone lands one by one onto the mat until the pelvis uncurls back to the starting position. Cue the client to deepen the abdominal muscles to achieve the maximum amount of spinal articulation onto and off of the mat. You might think only the hips and thighs benefit from this position, but it’s great for the glutes, back, and internal organs as well. Plus it helps improve circulation. Avoid letting the client drop the elevation of their hips during the bridge position, something that can happen as they tire. Re-engage the client with a touch spot by placing your hands on the client’s knees and tell them to send their energy forward towards you. This will lift the hips and activate the hamstrings, quadriceps, and glutes. Cue the client to reach long forward through the fingertips while pressing the backs of the arms into the mat. Place your hands on your client’s shoulders having them draw the shoulders away from your hands creating space between the ears and shoulders. Oftentimes the shoulders will lift to the ears when correcting the lower body. Now the client will be in the proper position for the Bridge.TECHNIQUE
During the Floor Work Element, it can be challenging for some clients to hold the correct form throughout the Bridge position. It’s important for them to avoid squeezing the glutes. To help here, cue the hips to lift to the ceiling while reaching long forward through the knees and remind the client to keep the backside relaxed. The hip points should remain level. Another great cue is to tell the client to hug the inner thighs together. A ball used here will help keep the knees aligned. The ball also gives the inner thighs some bonus work. Throughout the Bridge, cue the client to press evenly into the mat with their hands and feet. Pressing the palms and feet into the mat activates the triceps and hamstrings, increasing work in all the right places. When teaching this exercise, try not to quickly rattle off all of the cues at once. Instead, look at what needs to be corrected and cue from those observations. Go slowly. Make sure the client learns to hold the proper pose. Help them discover how it should feel when done correctly. Once the client has the proper pose down pat, you can then start speeding up the tempo of the exercise.Shoulder Bridge – Lift and Lower Hips

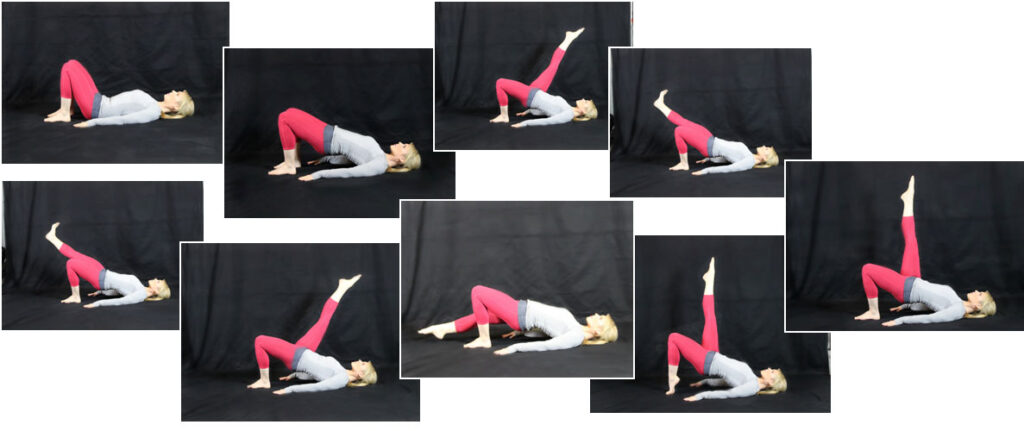
 Lie on your back with arms by your sides and legs about hip-width apart. Bend your knees to a position that allows the bottoms of your feet to rest flat on the floor.
Lift your hips to create a straight line between the shoulders and knees. Reach long through the knees and the crown of the head in opposition. Hold the position for eight counts, then lower your back and hips to the floor to complete.
Lie on your back with arms by your sides and legs about hip-width apart. Bend your knees to a position that allows the bottoms of your feet to rest flat on the floor.
Lift your hips to create a straight line between the shoulders and knees. Reach long through the knees and the crown of the head in opposition. Hold the position for eight counts, then lower your back and hips to the floor to complete.
Point Kick – Flex Knee to Knee

 Lie on your back with arms by your sides and legs about hip-width apart. Bend your knees to a position that allows the bottoms of your feet to rest flat on the floor.
Lift your hips to create a straight line between the shoulders and knees. Reach long through the knees and the crown of the head in opposition.
Straighten one leg and extend it toward the ceiling. Point the toes and kick the leg towards your nose with two pulses. Flex the foot and lengthen through the heel, then lower the leg until both knees are at the same elevation.
Lie on your back with arms by your sides and legs about hip-width apart. Bend your knees to a position that allows the bottoms of your feet to rest flat on the floor.
Lift your hips to create a straight line between the shoulders and knees. Reach long through the knees and the crown of the head in opposition.
Straighten one leg and extend it toward the ceiling. Point the toes and kick the leg towards your nose with two pulses. Flex the foot and lengthen through the heel, then lower the leg until both knees are at the same elevation.
Point Kick –Tap Floor

 Lie on your back with arms by your sides and legs about hip-width apart. Bend your knees to a position that allows the bottoms of your feet to rest flat on the floor.
Straighten one leg and extend it toward the ceiling. Point the toes and kick the leg towards your nose.
Lengthen the leg long and lower the leg knee tapping the heel to the floor.
Lie on your back with arms by your sides and legs about hip-width apart. Bend your knees to a position that allows the bottoms of your feet to rest flat on the floor.
Straighten one leg and extend it toward the ceiling. Point the toes and kick the leg towards your nose.
Lengthen the leg long and lower the leg knee tapping the heel to the floor.
Toe to Ceiling
 Lie on your back with arms by your sides and legs about hip-width apart. Bend your knees to a position that allows the bottoms of your feet to rest flat on the floor.
Lift your hips to create a straight line between the shoulders and knees. Reach long through the knees and the crown of the head in opposition.
Straighten one leg and extend it toward the ceiling while pointing the toes.
Lower the hips so the glutes almost touch the floor, then lift back up.
Lie on your back with arms by your sides and legs about hip-width apart. Bend your knees to a position that allows the bottoms of your feet to rest flat on the floor.
Lift your hips to create a straight line between the shoulders and knees. Reach long through the knees and the crown of the head in opposition.
Straighten one leg and extend it toward the ceiling while pointing the toes.
Lower the hips so the glutes almost touch the floor, then lift back up.
Toe to Ceiling in Releve
 Lie on your back with arms by your sides and legs about hip-width apart. Bend your knees to a position that allows the bottoms of your feet to rest flat on the floor.
Lift your hips to create a straight line between the shoulders and knees. Reach long through the knees and the crown of the head in opposition.
Straighten one leg and extend it toward the ceiling while pointing the toes.
Rise up to releve on the standing foot. Lower the hips so the glutes almost touch the floor, then lift back up.
]]>
Lie on your back with arms by your sides and legs about hip-width apart. Bend your knees to a position that allows the bottoms of your feet to rest flat on the floor.
Lift your hips to create a straight line between the shoulders and knees. Reach long through the knees and the crown of the head in opposition.
Straighten one leg and extend it toward the ceiling while pointing the toes.
Rise up to releve on the standing foot. Lower the hips so the glutes almost touch the floor, then lift back up.
]]>